Processing an Insurance Claim or Pre-Authorization
You can print an insurance form or send a claim electronically from MOGO. You can also batch claims in order to print them at a later time. You will find that sending claims electronically will avoid errors and increase cash flow in your office.
For electronic claim information see: Electronic Insurance Claiming
You also have the ability to print the ADA 94, ADA 2000, ADA 2002, ADA 2006, ADA 2012, Ohio Medicaid, Denti-Cal and Denti-Cal 2007, as well as an Attending Physician’s Report.
To process an insurance claim from the Transaction screen:
- Click on the
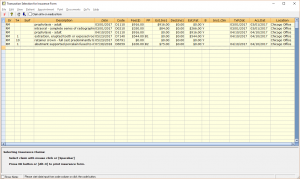
 Insurance icon at the top of the Transaction screen. The insurance selection window will open.
- Select the transactions to be printed on the insurance form by clicking with the left mouse button. You can also hold the [Ctrl] key to mark multiple lines.
or
- Select the transactions using the keyboard arrows to move up or down to your selection and press the spacebar to highlight.
- Tip: You can “unmark” a selection by clicking again with the left mouse button.
- You can also click on the Select All button to highlight all treatment. Click again on the Select All button to remove all highlighting.
There will be a box at the top of the insurance form selection screen that can be marked to “Claim all treatment on Medical Form”. This will allow you to include the selected dental treatment on the medical claim form. Note: If you selected only CPT and ICD codes, the HCFA medical claim form will open automatically.
Discounts can also be included with treatment when processing an insurance claim. The discount that is selected will be deducted from the total claim amount shown at the bottom of the insurance form. The discount fee will be shown on the claim form with a negative symbol (e.g., -10.00)
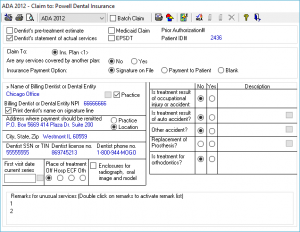
Click on the [OK] icon to continue. The ADA form screen will open.
These are the icons at the top of the ADA form screen:
 Select/Setup
- Opens the printer setup screen.
 Print/Send
- Used to both print and batch an insurance claim. If you are printing a claim now, batching a claim to print at a later time, or sending claims electronically, you will click on the Print/Send icon. If you are batching claims to print at a later time, you just need to first mark the “Batch Claim” box. If you are sending claims electronically, you just need to make sure the Form Type field says “Electronic Claim”.
- You will receive a message if any information is missing, such as name, address, birthdate or social security number. You will also be asked if you would like to correct the missing information. It is recommended that you answer “Yes” since missing information will cause a claim to be rejected!
- Note: Non-US zip codes can be entered if you have marked this option under the Office tab in Office Setup. If you have activated this option, you may still receive a message regarding “missing information” when you process an insurance form. Just click on “No” and you can still print the insurance claim form. Forms with non-US zip codes cannot be batched or sent via e-claim.
- Used to both print and batch an insurance claim. If you are printing a claim now, batching a claim to print at a later time, or sending claims electronically, you will click on the Print/Send icon. If you are batching claims to print at a later time, you just need to first mark the “Batch Claim” box. If you are sending claims electronically, you just need to make sure the Form Type field says “Electronic Claim”.
 Print Preview
- Allows you to view the insurance form before printing or batching. This option is “grayed out” if it is an electronic claim. If you select the Denti-Cal (California Medical Dental Program) form, there will be an Options button on the Print Preview screen. This is used only with the Denti-Cal form in order to adjust top and left margins.
 Form Type
- Used to select from a drop-down list of forms. Click on the down arrow in the text box to select. You can select from ADA 94, ADA 2000, ADA 2002, ADA 2006, Ohio Medicaid, Denti-Cal (California Medical Dental Program), Electronic Claim, and Attending Physician’s Report.
- The Form Type field will default to the form type that was entered in the Employer/Insurance information screen for this plan. However, you can click on the arrow at this field if you need to change it. If you select a different form type, MOGO will ask “Would you like to change the default form for this insurance plan?” If you select “Yes”, all patients with this same group plan will now have the new form. If you select “No”, you are only changing the insurance form for this patient.
- Used to select from a drop-down list of forms. Click on the down arrow in the text box to select. You can select from ADA 94, ADA 2000, ADA 2002, ADA 2006, Ohio Medicaid, Denti-Cal (California Medical Dental Program), Electronic Claim, and Attending Physician’s Report.
 Batch Claim
- Batches the claim for later printing. This is not used for electronic claims. By setting this option, all paper claims will automatically be batched for later printing instead of being printed immediately. This option is “remembered” by MOGO so that you only have to set it once to batch all claims. You can then print the batched claims from Go To and View Batch Claim on the menu bar on the Patient Lookup List or from any Transaction screen.
- Note: The “Batch Claim” option is “grayed out” if you selected “Electronic Claim” from the Form Type field. The Denti-Cal form cannot be batched for later printing.
 Print an Envelope
- This will default to an insurance address envelope. You can also select from the usual envelope options from this screen. For example, you could print an envelope to the patient’s home or business address.
 Change Options
- Allows you to enter the following:
- School Information – If required.
- School information is not required for the ADA 2002, ADA 2006 or electronic claims. If the insured family member is marked as child or other, and if they are 19 years of age or older, you will be asked to select their student status. You will be asked this question when you process either an electronic claim or the ADA 2002 or ADA 2006 form.
- The student status can also be selected by clicking on the Options button on the insurance form screen.
- Treatment Place – This field will indicate the same information that was selected on the ADA form screen in the “Name of Billing Dentist or Entity” field.
- Insurance Payment Option – The default for this insurance plan will be filled in. You can select from Signature on File, Payment to Patient, or Blank. If you make a change here, it will be saved for future use for this patient. Changing the payment option here does not affect any other patients.
- Number of Copies – The default is number 1. If this number is changed, it does not save.
- School Information – If required.
- Allows you to enter the following:
 View E-Claims
- Allows you to view a list of patients who have been batched to submit electronic claims. You can also send electronic claims from here. You can also view or send electronic claims from Go To and View E-Claim from the menu bar on the Patient Lookup List or from any Transaction screen. Note: Electronic claims are batched by selecting “Electronic Claim” in the Form Type field, and then clicking on the Print/Send icon.
 Check for NEA attachment requirement (Electronic Claim only)
- Checks to see if the treatment being claimed generally requires an attachment (such as an X-ray or intra oral image).
 Attach MOGO Image (Electronic Claim only)
- Sets the claim to ask for an attachment of an image stored within MOGO prior to sending to NEA.
 Attach Other Image (Electronic Claim only)
- Sets the claim to be sent to NEA for an attachment of an image stored outside of MOGO.
 Remove NEA Attachments (Electronic Claim only)
- If the claim has been marked to require an attachment (inside or outside of MOGO) this icon will remove the attachment marking.
 Help
Help
- Launches MOGO’s Help Knowledge Base.
 Close
Close
- Exits this screen without processing an insurance form.
An insurance claim code will be on the Transaction screen containing information about the Insurance claim.
Insurance claims and pre-authorizations are tracked in the To Do List under the Tx Status tab.
You can quickly re-print a past due insurance claim or pre-authorization from the To Do List, as well as from the Transaction screen.
- Right click on a past due insurance claim or pre-authorization to open the popup menu. Select “View Claim Form”. The previously printed form will be sent to the screen.
- You can re-print the claim by clicking on the Print icon on the viewing screen.
- The insurance form will re-print with the original signature date.
- The insurance claim code on the Transaction screen does not change when you re-print an insurance claim in this manner.
- “View Claim Form” is available for electronic claims in the ADA 2000, ADA 2002, ADA 2006, and ADA 2012 formats, batched claims that have been printed, the Ohio Medicaid form, HCFA claim, Physician’s Report, and Denti-Cal claim. When you view the HCFA claim or the Denti-Cal claim, you will only see the contents of the claim (not the actual form). You cannot reprint the Denti-Cal form from the viewing screen.


